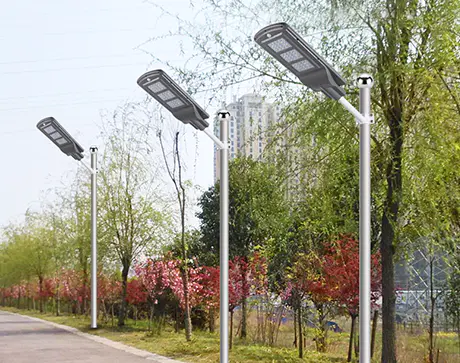
As a professional street light manufacturer, Hengyuan Lighting will explain to you how to install
solar street light today, and analyze the installation process step by step through the combination of text and installation diagrams. I believe that readers can learn the installation process in the fastest way. Some of the steps are applicable to later replacement of the components of the LED solar street light. Installation steps: Step 1: Install the LED solar street light pole, use a high-altitude lift to bind the pole and then hang it upright, arrange the cables, and firmly connect the solar street light pole to the base of the street light through bolts, and adjust the vertical Step 2: After completing the installation of the light pole, install the solar street light circuit parts, such as: solar panels, batteries, and the wires of the light source are connected to the controller. The overall installation diagram is as follows: Step 3: First, connect the wires of the light source directly to the controller. Connect to the wire of the battery to see if the light source is lit. You can determine the positive and negative poles of the light source wire (the positive and negative poles of the light source will not light up and the light source will not be damaged, so you can rest assured to test the light), and then connect the The positive wire is connected to the red wire corresponding to the light bulb icon on the controller, and the negative terminal of the light source is connected to the black wire corresponding to the light bulb icon on the controller. The wiring of the controller is installed as follows: Step 4: Use the DC voltage file of the multimeter Check the positive and negative poles of the battery outlet, connect the positive wire of the battery to the red wire corresponding to the battery icon on the controller, and connect the negative wire of the battery to the black wire corresponding to the battery on the controller. Step 5: Use the DC voltage gear of the multimeter to check the positive and negative poles of the outgoing wires of the solar panel, connect the positive wire of the solar panel to the red wire corresponding to the solar panel icon on the controller, and connect the negative wire of the solar panel to the controller There are black lines corresponding to the solar panels. Step 6: The street light controller does not need to be debugged. After the line is connected, it will directly enter the working state, because the program has been debugged and the time of intelligent lighting has been set at the factory. Note: The battery box of LED solar street light should be installed in a sealed state, and the waterproof pipe for threading should exceed the ground by 20CM to prevent rainwater from penetrating into the battery box. The location of the solar panel should be selected reasonably, and it should be ensured that the sun shines for as long as possible to achieve a long-term charging state.
are present in just about every facet of modern life.
Guangzhou Litel Technology Co.,Ltd. didn’t receive any negative feedback from our customers before, which proves that customers have faith in us.
solar lights continued to evolve to having strong manufacturers develop huge marketers and people came to value their opinions about what to buy.
Latest technology and manufacturing equipment has improved the quality of solar lights.
For more solar lights solar led flood lights suppliers reviews, tips and advice on choosing a washer and dryer for you and your family, please visit Litel Technology,where you can also choose the you are looking for.